
Decorating a room with photo prints is one of the few changes you can make to a space that is purely personal - nothing bought from a generic home decor catalogue, nothing that looks the same in a hundred other rooms. The result reflects actual memories, actual relationships, actual places. This guide covers every step of doing it well: choosing the right format for your wall, planning the layout, ordering the right prints, and mounting without damaging the walls. Part of the photo room decor guide.

Step 1 - Decide What You Want the Display to Feel Like
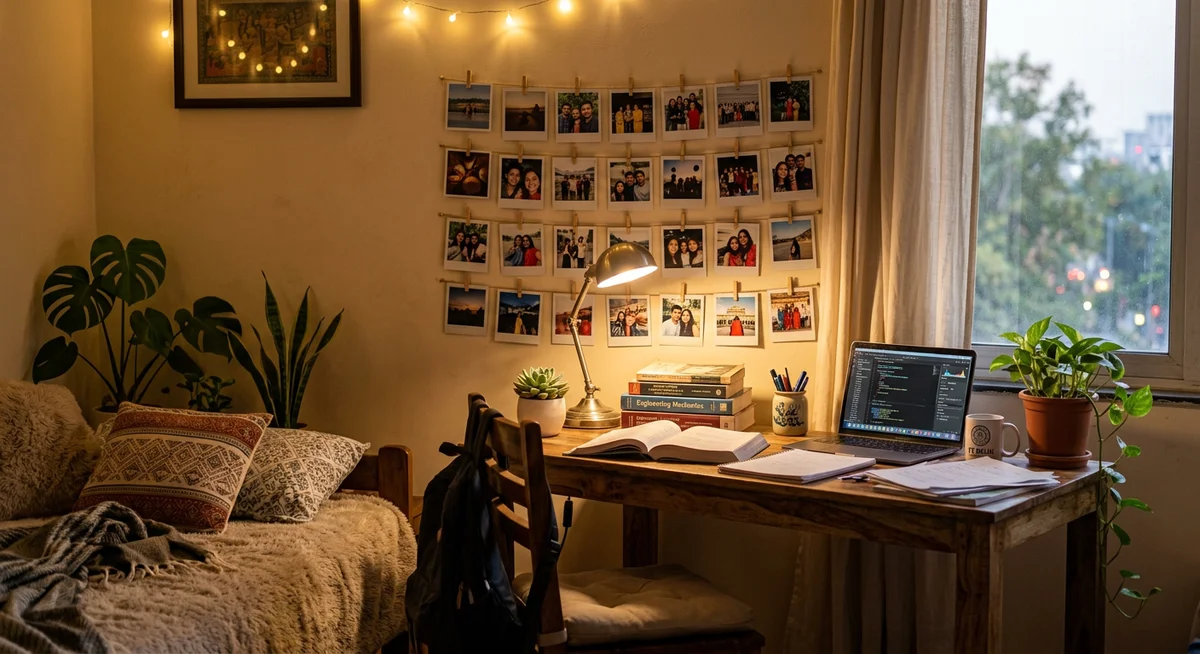
- Warm and personal: Polaroid prints with string lights. Corkboard collages. Mixed photos from different periods. Works in bedrooms, hostels, and any space meant to feel lived-in.
- Modern and curated: Square prints in a grid. Consistent colour temperature across all photos. Clean wall, no other decor competing. Works in living rooms, offices, and minimal spaces.
- Intentional and permanent: A single large framed timeless print - 5R or A4 - given its own wall space. One photo, one frame, one clear statement.
- Fun and energetic: Photo strips on mirrors and doors. Mixed format collages. Lots of photos from events, trips, and gatherings. Works in social spaces, shared rooms, dorm setups.
Step 2 - Choose Your Wall or Surface
The wall shapes the display. Measure before you order anything.
- Width: A string light display needs at least 1.5 metres of horizontal wall to look proportionate. A 3x3 grid of square prints at 10x10cm each with 3cm spacing needs about 40cm wide. A gallery wall should occupy at least 1 metre of width to feel like a gallery rather than a cluster.
- Height: String lights look best placed at roughly eye-level sitting height (about 120-130cm from the floor if your desk chair is the reference). Gallery walls look best centred at eye-level standing. Framed prints belong at eye-level - this is the most common mounting mistake.
- Light conditions: A wall in direct sunlight needs waterproof, pigment-based prints to resist UV fading. According to Library of Congress preservation data, dye-based prints fade visibly within 1-3 years in UV-exposed environments - pigment-based prints last decades.
- Rental constraints: Can you use nails? If not, see the damage-free mounting section below.
Step 3 - Select and Order Your Prints
Photo selection for a wall display is different from photo selection for gifting or albums. The wall context adds specific requirements:
- Colour coherence matters more than individual photo quality. A display with photos all taken in warm, golden-hour light will look unified. A display mixing cool-toned outdoor shots with warm indoor shots will look chaotic even if each individual photo is good. Choose photos that share a colour temperature.
- Subject variety within a unified theme. For a bedroom: a mix of people photos, a couple of travel shots, one or two detail shots (a favourite coffee, a view). The variety keeps the display interesting to look at over time. A wall of only selfies gets repetitive.
- For string light displays, choose horizontal compositions. Most polaroids are nearly square, so this matters less - but vertically-oriented photos (portrait orientation) clip awkwardly on string lights because they hang at an angle. Horizontal or square compositions clip flat.
- Original file quality only. No screenshots, no WhatsApp-forwarded images. A polaroid is small, but any pixelation in the source file will be visible at close viewing distance. Use original photos from your gallery.
Step 4 - Plan the Layout Before Mounting
The biggest mistake in room photo decoration: mounting everything, then realising the arrangement looks wrong. Planning takes 20 minutes and saves significant frustration.
- For string light displays: Run the lights first without photos. Confirm the position, the drape, and the power source. Then add photos one by one, starting from one end. Stand back after every five photos to assess the spacing and balance.
- For gallery walls: Cut paper templates to the size of each print and tape them to the wall with painter's tape. Spend 10-15 minutes moving the templates until the arrangement looks right. According to Architectural Digest, starting in the centre and working outward produces more balanced results than starting at a corner.
- For grids: Use a level and measuring tape. Mark the position of each print with a light pencil dot before committing. A grid that's off by even 2-3 degrees will look visibly crooked.
Step 5 - Mount Without Damaging Walls
Most rented rooms, hostels, and PG accommodations prohibit wall damage. These methods work without nails or screws:
- Removable adhesive strips (Command strips): Hold lightweight prints (polaroids, small squares) securely and remove cleanly. Follow the weight limits - a polaroid weighs almost nothing, but a framed 5R can exceed the strip's capacity. Test on a small inconspicuous wall area before committing to the full display.
- Washi tape: For polaroids displayed at angles or in an organic arrangement, washi tape holds the corners and peels cleanly from painted walls. Use two small pieces per corner rather than one long strip across the top.
- Magnetic poster strips: For larger prints or multiple prints in a row, thin magnetic strips (one on the wall, one on the back of the print) create a clean display with no adhesive on the print itself.
- Lean and stack: A framed print leaning against a wall on a shelf doesn't touch the wall at all. Works for larger framed prints where mounting would require anchoring into the wall.
- String lights as the anchor: The lights themselves attach at two ends (typically with small adhesive clips or command hooks at the corners). The photos hang from the lights and never touch the wall.

Room-Specific Tips
- Bedroom: Above the bed or desk are the two natural focal walls. String lights work for both. For the wall behind a bed, a single large framed print centred above the headboard creates a strong, hotel-like aesthetic with minimal complexity.
- Hostel room: You often can't drill and may have strict rules about adhesives too. String lights running along a headboard or shelf (attached only at two points, using small hooks in the wood) require no wall contact at all. For more display setups built around small spaces, see small room photo wall ideas India.
- Living room: The wall behind the sofa is the natural gallery wall location. It's the first wall visible when entering most living rooms and benefits from the most visual attention. For specific layout ideas suited to Indian homes, the living room photo decor guide covers four arrangements - sofa wall, console table strip, foyer, and shelf display.
- Study or work corner: Keep it simple. A corkboard at desk level that you can add to and rearrange without committing to a fixed arrangement. Three or four polaroids at eye level beside the monitor, not covering the entire wall.
Frequently Asked Questions
How do I start decorating my room with photo prints?
Start with string lights and polaroids - it's the quickest, most forgiving, and most popular setup. Order 15-20 polaroid prints, string fairy lights above your bed or desk, clip the photos to the lights. Takes 30 minutes. From there you can expand or add other display types as you go.
How many photos should I put on my room wall?
For string lights: 15-25 polaroids. For a grid: 9 or 16 square prints. For a gallery wall: 7-15 mixed prints. For a corkboard: 20-40 mixed. Start with fewer than you think you need - you can always add. An overcrowded display looks busy; a slightly sparse one looks curated.
How do I put photos on wall without damaging it?
Removable adhesive strips (Command strips) for lightweight prints. Washi tape for polaroids at corners. Magnetic strips for larger prints. String lights attached only at two end points. Leaning framed prints on shelves. All of these leave walls undamaged and remove cleanly.
What type of photo prints are best for room decoration?
Polaroids for string lights and corkboards (most popular in India). Square prints for grid walls. Timeless prints (4R, 5R, A4) for framing. Photo strips for casual placement on mirrors and doors. Use pigment-based prints - they won't fade on your wall over the years. Dye-based prints start degrading within 1-3 years under display conditions.
Can I use WhatsApp photos for room decoration prints?
No. WhatsApp compresses images to roughly 100KB, which prints pixelated even at small sizes like polaroid. Use original photos from your phone gallery. For older photos that only exist as WhatsApp-forwarded images, the best option is to use the original source if available - otherwise accept that smaller sizes (polaroid) are more forgiving of compression than larger formats.