A photo on your phone is a file. A photo on your wall is part of where you live. The decision to print and display photos is the decision to make your memories permanent fixtures of your daily environment - present every time you walk into the room, visible to everyone who visits, impossible to scroll past. This page is a complete guide to photo room decor in India: every display format, every room type, every arrangement style. Everything from picking the right format for the right wall to the small decisions that make a display feel intentional rather than random.
All display formats and prints referenced here are available as custom photo prints with pigment-based inks and waterproof coating - so your displayed photos look the same in five years as they do the day they go up.
The Display Formats
Polaroid Displays
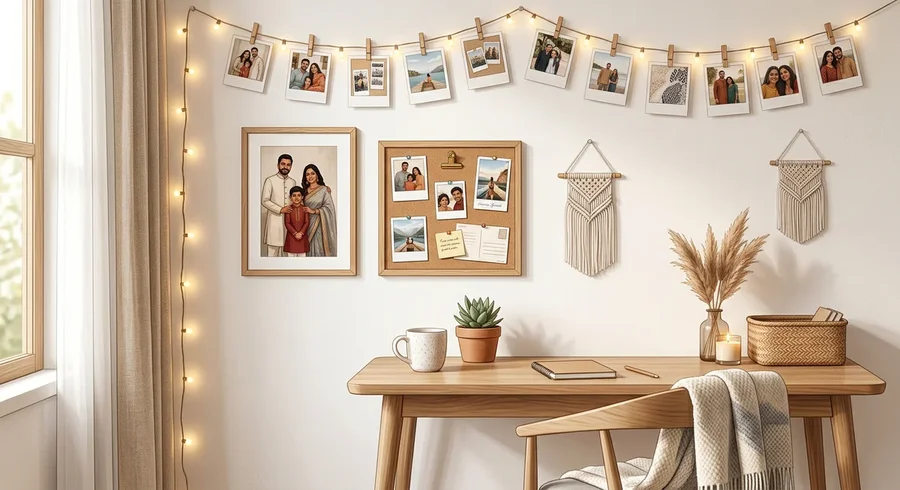
Polaroid prints are the most versatile display format for bedrooms and personal spaces. The white border adds warmth. The small size (roughly 9 x 11 cm including the border) means you can display many at once without the wall feeling heavy. And the format carries an emotional temperature - polaroids feel like memories rather than decoration.
Common polaroid display configurations:
- String light display: Clip 15-25 polaroids to a string of fairy lights stretched across a wall above a desk or bed. The combination of soft light and photos creates a warm, almost cinematic effect. Most popular in bedrooms, hostel rooms, and study spaces.
- Corkboard or pegboard: Pin 20-40 polaroids in an organic arrangement on a corkboard. Add a few sticky notes, ticket stubs, or small mementos. The board becomes a living collage rather than a static display - you can add new photos and rearrange existing ones over time.
- Tape grid: Arrange polaroids in a clean grid directly on a painted wall using removable adhesive dots or washi tape. Works on white or light-coloured walls. The grid gives structure; the variety of photos gives warmth.
- Scattered organic arrangement: No grid, no strict layout - polaroids placed at varying angles across a section of wall. The slight randomness mimics the feeling of photos spread across a table. Best in rooms with a more casual, lived-in aesthetic.
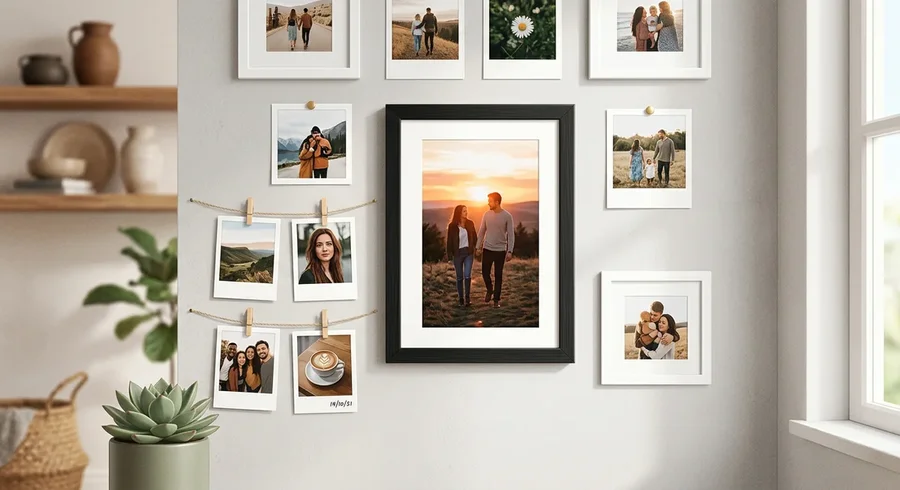
Gallery Walls
A gallery wall combines multiple prints - typically different sizes and sometimes different formats - into a single cohesive display. Done well, a gallery wall becomes the focal point of a room. Done without planning, it looks cluttered.
The structural principles that make gallery walls work:
- Anchor first. Start with the largest print and build the arrangement outward from it. The anchor piece (typically a framed 5R or A4) sets the visual centre of gravity. Everything else orbits around it.
- Mix sizes deliberately. A gallery wall with all the same size prints looks like a grid, not a gallery. Vary the sizes - one large piece, a few medium, several small. The size variation creates hierarchy and movement.
- Consistent element. With varied formats and sizes, something needs to hold the display together. Options: same colour temperature across all photos (warm tones throughout), same time period (only travel photos, or only family photos from one year), or same frame style if you're using frames.
- Plan on paper before nailing. Cut paper templates to the sizes of each print and tape them to the wall first. Move them around until the arrangement feels right. This saves holes in the wrong places.
According to Architectural Digest's gallery wall guidance, the most common mistake is starting with too little space. A gallery wall needs breathing room - at least 5-8 cm between frames, and a minimum wall section of 1-1.5 metres wide to feel like a proper display rather than a cluster.
Grid Displays
Square prints are made for grids. The 1:1 ratio and borderless format means they sit perfectly edge-to-edge with uniform spacing. Common configurations: 2x2 (four prints, compact), 3x3 (nine prints, strong wall presence), 4x3 or 3x4 (twelve prints, suitable for a wide statement wall).
Grid displays work best on white or neutral-coloured walls with good ambient light. They need the photos to be curated - a nine-print grid where the photos have wildly different colour temperatures or subjects looks chaotic. Choose photos that share something: a trip, a colour palette, a time period, a relationship.
Framed Statement Prints
A single large timeless print - 5R or A4 - in a quality frame is the most permanent and intentional form of photo display. One photo, one frame, one dedicated wall space. This is for the photos that matter most: wedding portraits, travel landscapes that defined a trip, family milestones that deserve their own moment.
The key decision is placement. A framed print at eye level on an otherwise empty wall creates a focal point for the entire room. The same print crowded between other objects loses its presence. Give a statement print space - a wall or section of wall that is otherwise clear.
Room-by-Room Guide
Bedroom
The bedroom is the most personal room in a home and the most popular space for photo displays. The wall above the desk, the section above the bed, or the area near the window - any of these can support a display. The format should match the room's aesthetic.
- Above the bed: String lights with polaroids for a warm, soft effect. Or a single large framed print centred above the headboard. The bed creates a natural visual base; the wall above it is a natural focal point.
- Above the desk: Corkboard with photos, notes, and mementos. This is a working display - functional and personal. Polaroids work well because they can be added and rearranged without needing new frames or holes.
- Accent wall: A gallery wall on the wall opposite the bed - the one you see first when you wake up. If you have a strong photo set for this, a 3x3 grid of squares or a mixed gallery creates a significant presence.
For specific bedroom decor ideas including hostel rooms and rented spaces where you can't drill walls, the room photo print decoration guide covers damage-free mounting options.
Living Room
The living room display is semi-public - visible to guests and family, more curated than the bedroom. It calls for a higher level of intentionality in photo selection and arrangement.
- Statement piece: A framed A4 or 5R above the sofa or on the primary feature wall. One photo that the room is built around. Works especially well with a landscape that has personal significance - a place you've been, a view from your home city.
- Family gallery: A mixed display with family photos from different periods. The living room is the family space - a gallery wall that traces relationships and milestones fits the room's social function.
- Symmetrical pair: Two matching framed prints on either side of a window or door. Simpler than a full gallery wall, creates visual balance without requiring a large wall section.
Study and Work Corner
A work space benefits from photos that motivate or ground you without distracting you. A few polaroids clipped to the edge of a monitor, a small framed print at eye level beside the screen, a corkboard with photos and project reminders. The goal is personal presence without visual noise.
Hostel and PG Rooms
The challenge in hostel and PG rooms is non-damaging display - most landlords prohibit nails or permanent fixtures. String lights with clips (no wall contact needed if you can run them along a shelf or headboard), removable adhesive strips for lightweight polaroids, and corkboards that sit on desks or lean against walls all work without touching the walls. The full guide to decorating with photo prints includes a section on damage-free mounting.
Planning Your Display
A display that looks effortless typically involved significant planning. These steps prevent the most common mistakes:
- Choose your wall first. Before picking formats or ordering prints, decide where the display will live. Measure the wall section. Assess the light - natural light makes photos look warm, overhead light can create glare on glossy prints. The wall determines everything else.
- Choose your format for the wall. High-traffic area with lots of ambient light? Matte prints or prints behind glass. Cosy corner you'll view close-up? Any finish works. String light display? Polaroids. Gallery wall? Mix of sizes. Let the wall dictate the format.
- Curate the photos. More is not better. 15 photos that belong together will beat 40 that are loosely related. Spend time selecting before ordering. The constraint of having to choose makes the display more meaningful, not less.
- Test before committing. For gallery walls, tape paper templates to the wall first. For string lights, run the lights and clip a few placeholder pieces before the final prints arrive. Confirm the arrangement before nailing or permanently adhering anything.
- Leave room to grow. A display that fills every available space has no room for new memories. Leave 20-30% of the space empty so you can add prints as life continues.
According to Library of Congress preservation guidance, displayed prints should be kept away from direct sunlight (UV accelerates fading) and high humidity areas like bathrooms. Pigment-based prints handle these conditions significantly better than dye-based prints, but all prints last longer in stable, indirect-light environments.
Format Quick Reference
- String lights + polaroids: Bedrooms, hostels. Warm, personal, easy to rearrange.
- Corkboard collage: Desks, study spaces. Living display, add and remove freely.
- Square grid: Living rooms, minimal aesthetic spaces. Clean, modern, curated.
- Gallery wall: Living rooms, feature walls. Mixed sizes, high visual impact.
- Single framed statement print: Any room. Permanent, intentional, requires clear wall space.
- Photo strips on mirror or door: Casual, small-space solution. Tape to edges of mirrors, inside wardrobes, on the back of doors.
Explore the Full Room Decor Series
- How to Decorate Your Room with Photo Prints - complete setup guide for every room type
- Polaroid Wall Collage Ideas - specific layouts and arrangements for polaroid displays
- Aesthetic Photo Room Decor Ideas India - curated ideas for specific room aesthetics
- DIY Photo Wall Art Ideas on a Budget - creative displays without spending a lot
- How to Create a Photo Gallery Wall at Home - step-by-step gallery wall guide
Frequently Asked Questions
What is the best way to display photo prints in a bedroom?
String lights with clipped polaroids above the bed or desk is the most popular bedroom photo display in India. It works in any size room, doesn't require drilling, and creates warm ambient lighting alongside the photos. For a more permanent display, a gallery wall above the bed with a mixed arrangement of polaroids and one or two framed prints creates a strong focal point.
How many photos should a room photo display have?
For string lights: 15-25 polaroids. For a corkboard: 20-40 mixed photos. For a grid wall: 9-16 square prints. For a gallery wall: 5-15 mixed sizes. For a statement display: 1-3 framed prints. More is not better - curated displays with fewer intentional photos look significantly better than random collections of many photos.
How do I hang photo prints without damaging walls?
Removable adhesive strips (Command strips) hold lightweight polaroids and small prints without leaving marks. String lights clip-to or run along headboards and shelves without touching walls. Corkboards and pegboards lean against walls or sit on desks. Leaning framed prints against the wall (on a shelf or floor) requires no mounting at all. For heavier prints, picture-hanging strips from adhesive brands support up to 3-5 kg without drilling.
Which photo format is best for room decor?
Polaroids for personal, warm displays (bedrooms, desks). Squares for modern grid arrangements (living rooms, minimal spaces). Framed timeless prints for statement pieces (any room). Photo strips for casual accent placement (mirrors, doors, bookshelves). The format should match the room's aesthetic and the display's purpose - there's no single best format.
How do I prevent photo wall displays from fading?
Use pigment-based prints (not dye-based) - they last 50-100+ years vs 1-3 years for dye prints. Keep displays away from direct sunlight and high-humidity areas. In India's climate, waterproof coating on prints (included with pigment-based printing) also prevents moisture damage during monsoon season. No amount of placement optimisation saves a dye-based print in a sunny room.